
File:Symbol DS6707 Config PickSheet.svg

Original file (SVG file, nominally 765 × 990 pixels, file size: 127 KB)
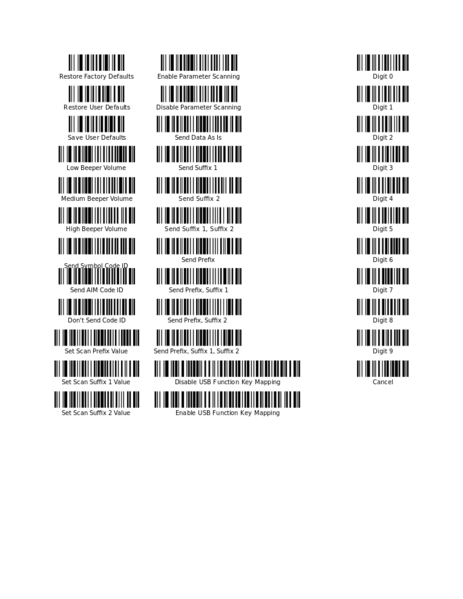
A palette of configuration barcodes for the Symbol DS6707.
This SVG file is the source document: there is no other format. It should be edited with Inkscape.
Adding New Barcodes
This procedure assumes a working knowledge of Inkscape.
These barcodes are extracted from the PDF version of the DS6707 User Manual using Inkscape. To extract a new barcode, first use a PDF reader to find the barcode you want in the manual and note the page number. It needs to be the page number continuously numbered from one, not the one printed on the page. Create a new document in Inkscape. Click File → Import and select the manual PDF file. Enter the page number in the Select page box and click OK.
Locate the barcode you want on the page and select it. You may have to ungroup it from other objects several times. Once the barcode is isolated, you'll find that it's constructed one of two ways. I'll either be a group of path objects or a single rect object with a bitmap mask. Use the XML Editor to identify which kind you're working with. Both of them require some processing before they can be used.
Processing path-based Barcodes
Since paths are vector elements these are almost ready to use. It is necessary, however, to ensure that each path in the group is filled in either black or white. Some of the path-based barcodes are not quite black, which means they don't come out as crisp on a laser printer.
Processing rect-based Barcodes
The rect-based barcodes are much more annoying to deal with. They're built out of a vector rectangle masked with a bitmap image. In order to make them useful you need to convert that image into a vector path. First, separate the image from the rectangle with Object → Mask → Release. Delete the rect object with the XML Editor. Now you have the bitmap image on its own. Being originally a mask, the image will be in reverse color. Fix that with Extensions → Raster → Negate.
Next, you need to trace the image to get a path. However, the automatic tracer doesn't deal well with straight lines in images as small as the barcode, so you'll need to drastically increase its resolution. Open Extensions → Raster → Resample..., set the width and height to 1000, and click OK. Then proceed to open Path → Trace Bitmap.... Choose the Brightness cutoff mode, set the threshold to 0.9, and click OK. Delete the image object with the XML Editor and use File → Vacuum Defs to make sure it's really gone. You should now have the barcode as a path.
Sizing and Labeling
Once you have your barcode as a black-and-white vector path you need to format it consistently with the rest of the barcodes in this document. First, select the barcode and use the properties bar to set its height to exactly 0.3 inches. Next, use the text tool to create a label in centered 10-point Sans. Position the label immediately under the barcode, then use the alignment tools to verically center them and offset them vertically by 5 pixels. Group the barcode and label, then copy and paste them into the palette document.
File history
Click on a date/time to view the file as it appeared at that time.
| Date/Time | Thumbnail | Dimensions | User | Comment | |
|---|---|---|---|---|---|
| current | 21:13, 11 September 2015 | | 765 × 990 (127 KB) | Sammich (talk | contribs) | A palette of configuration barcodes for the Symbol DS6707. |
You cannot overwrite this file.
File usage
The following page uses this file: